


Using Google as an Open ID Connect authentication source for Salesforce.com
Google’s service supports OAuth 2.0 / OpenID Connect as an identity provider, and Salesforce.com supports using OpenID Connect as an authentication source. Between the two of them you can use your Google user database (in a business context this is usually Google Apps for Business) to log into Salesforce.com, and so giving all your employees automatic access to your SFDC deployment but keeping all your user accounts centralized in Google.
NB: Use this information at your own risk. There is the potential to lock users out of your Salesforce account, or lose access yourself if this configuration is not correctly applied.
The Google bit:
- First, access the Google cloud console https://cloud.google.com/console and create a New Project. The name should be something like “Salesforce” so it can be identified later, you can use the project ID that google automatically fills in.
- Open the Project, and select APIs and Auth, and then Credentials
- In the OAuth section click Create new Client ID. Leave Web Application selected as the type, and click “Create Client ID”. We’ll come back and change the configuration of this client ID later.
- Keep this window open or note the “Client ID for web application” table elements for the next section.
- Click “APIs” in the left navigation. Scroll down and find “Google+ API” and click the “ON” button to enable this API.
The Salesforce bit:
- Log into Salesforce, and open the Setup page.
- Under the Administer section, choose Security Controls, and then Auth. Providers.
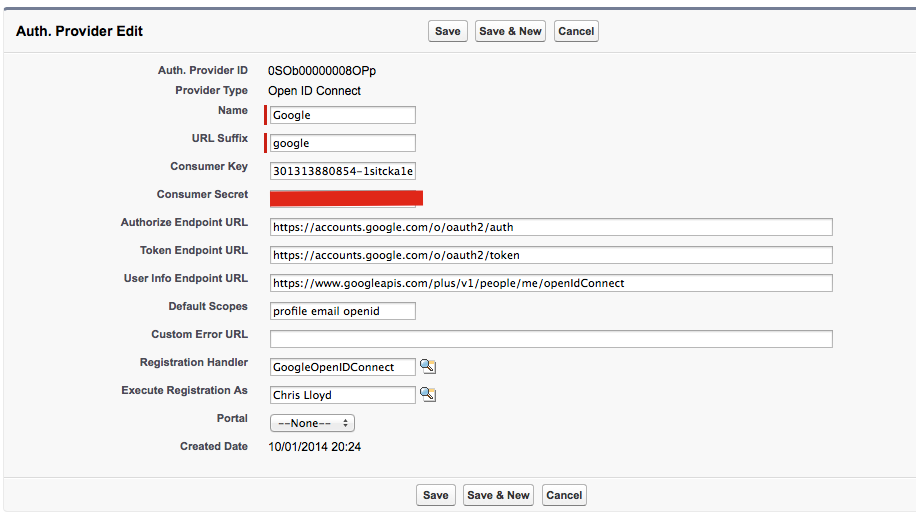
- Create a new Provider and choose the type OpenID Connect
- Use the following configuration:
- Name: Google
- URL Suffix: google
- Consumer Key: This is the “Client ID” generated by Google.
- Consumer Secret: This is the “Client secret” generated by Google.
- Authorize Endpoint URL: https://accounts.google.com/o/oauth2/auth
- Token Endpoint URL: https://accounts.google.com/o/oauth2/token
- User Info Endpoint URL: https://www.googleapis.com/plus/v1/people/me/openIdConnect
- Default Scopes: profile email openid
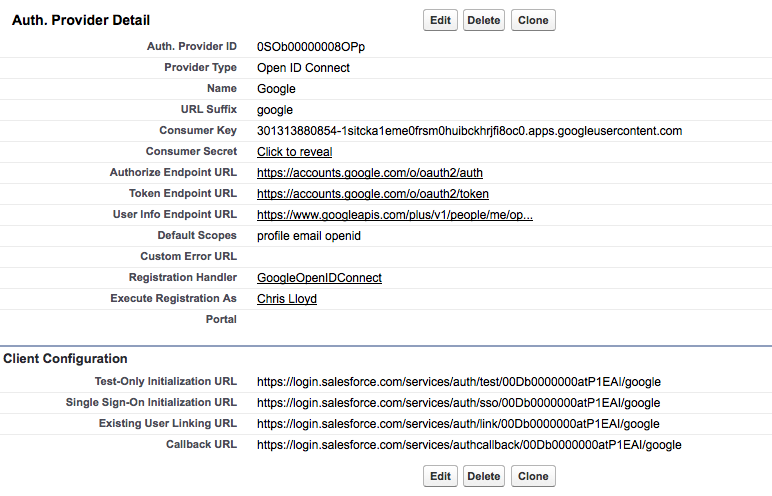
- Choose Save. The Client Configuration will now be showing a “Callback URL”. Go back to the Google console and click the Edit Settings button for the Web Application created above. Copy the “Callback URL” from Salesforce and replace the “Authorized redirect URI” in the Google console. Click Update on the Google console.
Testing Salesforce login:
- Copy the “Test-Only Initialization URL” listed under “Client Configuration” in the Auth Provider into a web browser. You should be redirected to Google that will ask you whether you want to share parts of your profile with Salesforce.
- Once you authorize the request, Salesforce will display the XML block it received from Google with your profile information. It should look something like this:
<user>
<id>105181064275580232932</id>
<org_id>00Db0000000atP1</org_id>
<first_name>Chris</first_name>
<email>chrisl@dice.neko-san.net</email>
<portal_id>000000000000000</portal_id>
<locale>en-GB</locale>
<last_name>Lloyd</last_name>
<provider>Open ID Connect</provider>
<full_name>Chris Lloyd</full_name>
</user>
If you have existing accounts in Salesforce that you want to link to Google IDs, you can ask each user to use the “Existing User Linking URL”. This will assist them in joining their Google Apps account to their Salesforce account.
Now that the authentication link is established, if you have a custom domain such as “dice.my.salesforce.com” you can make Google the default authentication source for that Salesforce domain. This appears to only be possible if you have a Salesforce edition that supports developing your own Apex Classes, since one needs to be inserted that copies the attributes returned by Google into a Salesforce user object.
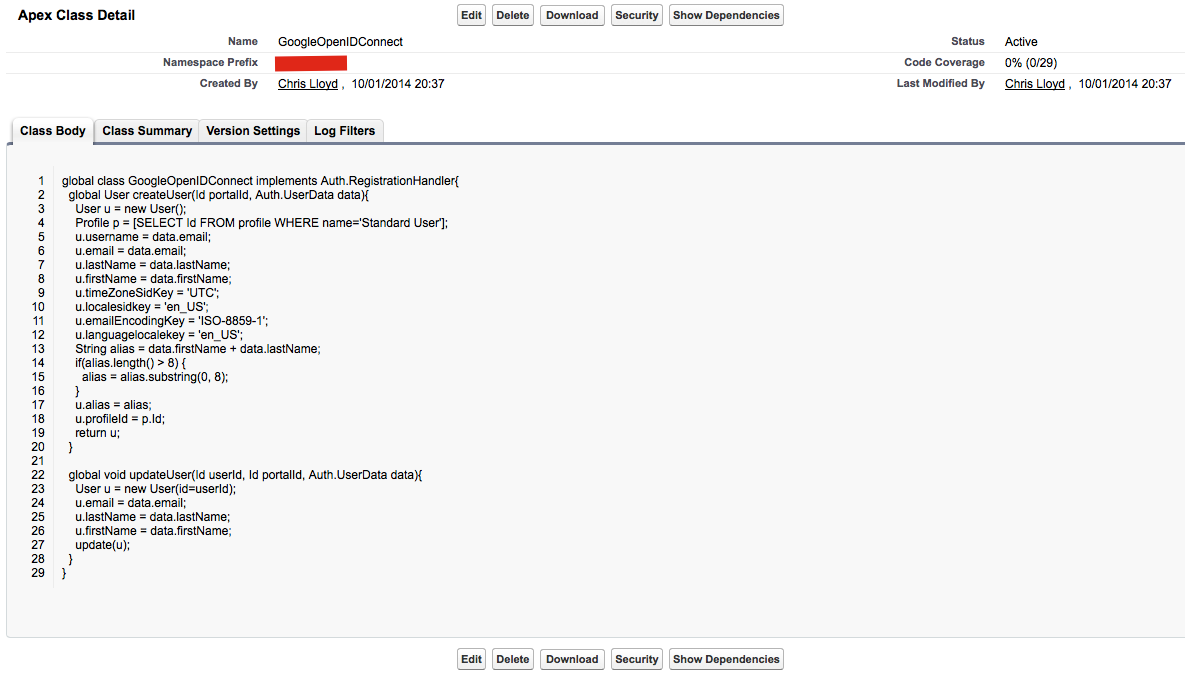
The Salesforce registration handler:
As a developer, or in a Salesforce Sandbox, create a new Apex Class and insert the following code:
global class GoogleOpenIDConnect implements Auth.RegistrationHandler{
  global User createUser(Id portalId, Auth.UserData data){
    User u = new User();
    Profile p = [SELECT Id FROM profile WHERE name='Standard User'];
    u.username = data.email;
    u.email = data.email;
    u.lastName = data.lastName;
    u.firstName = data.firstName;
    u.timeZoneSidKey = 'UTC';
    u.localesidkey = data.locale;
    u.emailEncodingKey = 'ISO-8859-1';
    u.languagelocalekey = data.locale;
    String alias = data.firstName + data.lastName;
    if(alias.length() > 8) {
      alias = alias.substring(0, 8);
    }
    u.alias = alias;
    u.profileId = p.Id;
    return u;
  }

  global void updateUser(Id userId, Id portalId, Auth.UserData data){
    User u = new User(id=userId);
    u.email = data.email;
    u.lastName = data.lastName;
    u.firstName = data.firstName;
    update(u);
  }
}
This code uses some defaults for the timezone, locale, email encoding and language that can be modified to affect all newly created users. After successful login the user can change these options for their own profile.
The Salesforce Apex Class
Once the class is created, push it to Production and return to Auth. Providers and edit the Google provider.
- In “Registration Handler” select the “GoogleOpenIDConnect” handler
- In “Execute Registration As” pick a service user account that will be used to create all new users logging in via Google. This user must have the “Manage Users” permission.
- Save the configuration
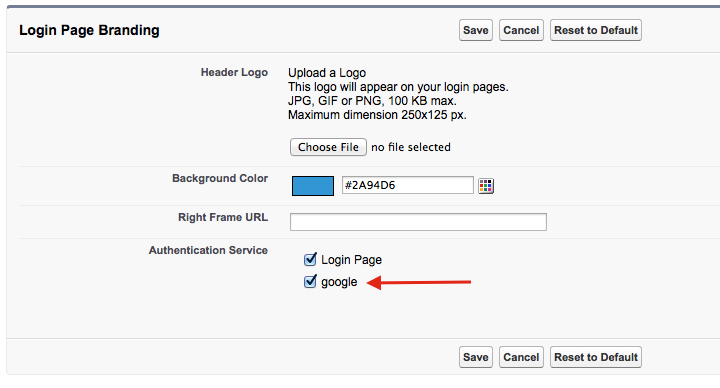
- Click “Domain Management” in the left hand navigation and choose “My Domain”
- Under “Login Page Branding” click Edit
- In the “Authentication Service” section add the ‘google’ service, and optionally unselect the “Login Page” option.
The Salesforce configuration
The Google configuration

The Salesforce domain configuration
The Salesforce URLs
After these changes, when a user visits your domain like http://dice.my.salesforce.com/ they will be redirected to Google to authenticate. If the user does not have a Salesforce account one will be automatically created.
References:
https://developers.google.com/accounts/docs/OAuth2Login
http://help.salesforce.com/apex/HTViewHelpDoc?id=sso_provider_openid_connect.htm&language=en_US
Comments
Thanks for this extremely helpful post.
The only thing I had to do differently was number 5 of “The Google Bit”, where it says,
Click “APIs” in the left navigation. Scroll down and find “Google+ API” and click the “OFF” button to enable this API.
The toggle had to be turned on for mine to work properly.
Thanks again.
mbWhoops, of course you’re right that should say “ON”. I’ve updated the post, thanks!
hi, i tried your guide i am able to login using my google credential already
but 1 thing is i am unable to logout, whenever i click My Name -> Logout. It will automatically login for me again.
what am i doing wrong here?
Thanks!
It’s likely because you’re still logged in with Google. Probably SFDC is logging you out, redirecting you to the SFDC login service, which redirects you to Google (which knows who you are), bounces you back to SFDC and logs you back in.
You can check that by deliberately logging out of Google, then logging out of SFDC. Then you should get the Google login prompt.
SAML has a concept called Single Logout, where if you log out of one service it logs you out of all the services you’re logged into. However I don’t believe OpenID has that feature. So probably it’s not possible to solve this issue with SFDC and OpenID.
Our enterprise is currently running over a 1000 accounts on Chatter Free. I’m interested in implementing this authentication method for one portion of my users who have Google Business App IDs and still allow the other portion log-in using their existing Chatter credentials. I’m hoping someone has successfully implemented the multiple authentication method in a similar scenario.
1. Did you face any issue with accounts getting locked out when this feature got implemented?
2. Has anyone successfully run both authentication methods – Google & Chatter – concurrently?hi,
I tried your guide & managed to complete the process but fail to log in via the Google & it’s prompt bleow:“Error
There was a problem with your authentication attempt. Please try again. If you continue to encounter problems, contact your administrator.”
Any clue?
Thank you.
Choo PengAre you using the automatically generated registration handler? This won’t generate users dynamically. You need to edit the registration handler code and implement whatever policy you need.
Hi, I’m getting a similar issue like Choo, except when I’m using the Test-Only Initialization URL. I’d open a new browser, copy/paste the url and sign into my google account, which will take me to the consent screen. I press ‘ok’ then I’ll get the error url:
https://na10.salesforce.com/_nc_external/identity/sso/ui/AuthorizationError?ErrorCode=No_Openid_Response&ErrorDescription=Bad+responseI am using a custom registration handler similar to what James Melville shared at https://github.com/jamesmelville/OpenIdConnectDemo/blob/master/src/classes/GoogleHandler.cls
Could this be an issue with my settings on my domain?
Thanks!